Mametastic
Finished!

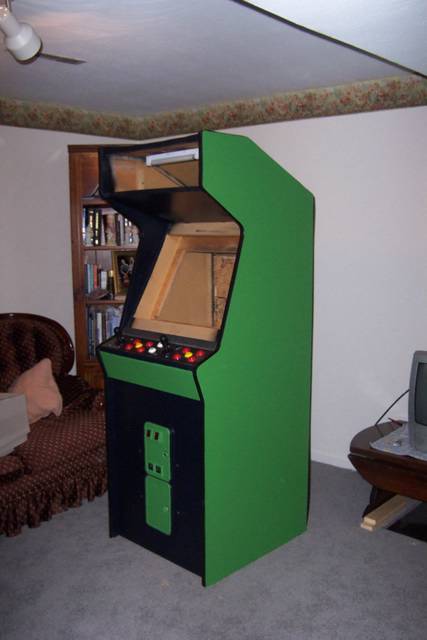
It just dawned on me today that I never posted pictures of my finished MAME cab! So here are two of them, from different angles:


It took a little over a month to build the cab from start to finish, much of that time being spent trying to be thrifty when buying parts. The total cost came to $406.13, which ends up being $6.13 over budget :)

After having it now for a few months, there are a couple of things I may change when I get the time. For one, the monitor is pretty small. It's still definitely big enough to see things just fine, but I would love to get a 19in. true arcade monitor in there. The other thing I'd do is either build or buy a new control panel. I'd like to have a larger one with tons of admin buttons, as well as a slide-out keyboard tray.

It was a blast building one of these, and for those of you out there that are considering building your own, by all means go for it. It's not all that hard, and thanks to the incredible community over at BYOAC I was able to quickly get help whenever I got stuck.


posted by Brian at 2:50 AM 0 comments
The marquee is here!

I just got my marquee today from mamemarquees.com! The quality is outstanding and I'd recommend them to anyone looking for a marquee. It only took about 3 days from start to finish to get the marquee printed and shipped. Very painless. Here's a pic of it sandwiched between my plexiglass. My marquee retainers (a.k.a. screen-window retainers) are currently drying from their last coat of paint. Later tonight I'm going to try and get the marquee in place, and once that happens, the cabinet will be complete!


posted by Brian at 1:56 PM 0 comments
It lives!

Well a bunch has happened with the progress of my MAME cab. I was able to snag a case, mobo, PSU, cpu, cd-rom, and 20 GB hard drive from a co-worker of mine (thanks Neil!). The system had definitely seen better days, as it had been in a flood and sat in water for a weekend. But regardless, it was a freebie, so I was going to try my best to get the thing working. Unfortunately, after many unsuccessful attempts, I had to pronounce it officially dead. Cause of death - a fried motherboard.

So anyways, I salvaged the hard drive, and I'm going to use the PSU, cpu, and cd-rom as spare parts if I need them.

Now fast forward to today where I bought a case, mobo, and PII 400 Mhz cpu that was going to be scrapped for parts from work (it definitely helps being an IT guy) for $15 bucks. Plus I had ordered a 300W power supply from TigerDirect a few days ago, and it arrived today. A couple of phone calls and a quick trip to a local computer shop later, and I had myself 128 MB of SDRAM. A final stop at Circuit City and I snagged a cheapo sound card (and Trans-Siberian Orchestra's new CD!). I already had a spare 64 MB GeForce 2 Pro video card and a MS Internet keyboard sitting around, so I now had all the parts I needed.

As I write this, I'm loading XP SP2 on the system. I'm hoping to have the pc installed in the cab and functioning before I go to bed! After that, all that's left will be to get the marquee printed and attached.


posted by Brian at 5:22 PM 0 comments


The computer, in the process of having SP2 installed. Posted by Hello


posted by Brian at 5:22 PM 0 comments


A quick shot of the power supply box and sound card box. Posted by Hello


posted by Brian at 5:21 PM 0 comments
Let there be sound!


Here's a shot of the speakers I bought today at Best Buy. Both of the speakers fit perfectly up in the marquee, and the subwoofer sits pretty snug in the bottom-front end of the cab. To test it out I hooked up the speakers to my TV and they sound pretty good for what I paid. Posted by Hello


posted by Brian at 10:47 AM 0 comments


Just a quick shot of the marquee I designed today. I made this one from scratch and overall I like how it came out. I think we have a winner! Posted by Hello


posted by Brian at 11:43 AM 0 comments
Getting close!

Here's a couple of more pictures on some of the progress I made last weekend (it's taken me a week to get around to taking pictures!). Basically the monitor and control panel are now in place. The only things left to do now is buy a couple more computer components and decide on a marquee.


posted by Brian at 4:05 PM 0 comments


A view from the front where you can see the monitor and control panel now attached. All that's left is the marquee and computer! Posted by Hello


posted by Brian at 4:04 PM 0 comments


Here's the monitor from the back, resting on the mount. Posted by Hello


posted by Brian at 4:03 PM 0 comments
Small update

On Friday my t-molding came, so this weekend I redid the t-molding on the cab, and finally lugged the thing out of my garage and into the house. I also made a monitor mount and attached the back door to the cab.

This weekend I got lucky finding a monitor. I was calling all of the computer shops around my area when I came across a small local shop called Mossor Computers. It turns out they had two older, used 15'' monitors that they never tested to see if they even worked, but they told me that if I'd come and get them they would give me both of them for free! So I booked it up there and grabbed them both, brought them home, and tested them - and both worked! The one that's going in the cab looks great, but the one that will be my spare doesn't like to go very bright before it gets cranky and starts to look like crap.

Granted, a 15'' monitor looks a bit small in the cabinet made for a 19'' arcade screen, but I'm not going to complain since the monitor was free. Plus, I can always upgrade to a nicer monitor later.


posted by Brian at 5:31 AM 0 comments


The cab with the control panel connected and the new t-molding applied. Posted by Hello


posted by Brian at 3:36 AM 0 comments


A view from the back. You can see here that I've got the back door mounted now, and on the inside you can see part of the monitor mount I put up. Posted by Hello


posted by Brian at 3:35 AM 0 comments


The monitor that's going to go in the cabinet. It's a 15'' compaq. Posted by Hello


posted by Brian at 3:34 AM 0 comments